The Classrooms are becoming more and more paperless day by day. Teachers have to find solutions to hand out assignments, share notes, articles, grade the assignments and so on.
A rapidly growing number of teachers are finding their way to Google Classroom. An ingenious virtual classroom that focusses less on tech and more on teaching. You don’t have to be a Tech Professional to handle this classroom.
In this post, I’ll explain what Google Classroom is and what you can do with it. Afterward, I’ll show how to set up the Google Classroom on Phone and on the website.

Google Classroom is an application designed by Google. Google Classroom helps teachers and students to communicate and can be used to organize and manage assignments, to go paperless. It can be also used as a collaboration tool between teachers and the students and so on!
It’s built on top of Google Drive and Google Docs, Which means it is very easy to use and intuitive for any teacher. But that doesn’t mean it’s boring. Google Classroom is full of surprises you’ll encounter along the way. I hope this post gets you starting with the basics.
Things You Can Do with Google Classroom

So this would be an obvious question. Why would anyone use this application? What are the merits?
First of all, it’s completely free. There is no pro version of the app that will cost you money. Nothing AT ALL.
After the classroom is set up (I’ll describe the setup in further steps), First lemme show why Google Classroom is a big deal. Here is a list of things that you can do with google classroom :
- Add announcements and lesson material: Give your students announcements about your lesson. Add lesson materials in the announcements. That way, students can find everything quickly. You can add materials from a Google drive, connected to that Google Classroom lesson, add files and images from your computer, add a YouTube video or add any other link you want your students to visit. It’s that easy!
- Add assignments: Just like adding an announcement, you can add an assignment to your course. It works the same way, but here you get the option to add a due date. It will notify your students when they have to make an assignment and it will also appear in their Calendar.
- Grade an assignment: Afterwards, you can check and grade the assignments your students have handed in. There’s room for feedback via a teacher comment. Then, send the assignment back to your students.
- Manage students: Of course, your students have to be able to share comments. Or not? That’s completely up to you! You can manage permissions, giving students the ability to post and comment, only comment, or give only the teacher the ability to post and comment. You can even e-mail your students individually.
Things You cant do with Google Classroom
There are a few things you should know before you start using Google Classroom for the wrong reasons. It’s an online learning platform, but it isn’t:
- A chatbox: You can comment on assignments and announcements, but there’s no chat function. If you do want to be in direct contact with your students, you can send them an email, or you can enable other Google apps to take over that function.
- A test or quiz tool: There are some possibilities when it comes to making quizzes in Google Classroom, but it’s still not meant to be a quiz tool. There are so many other good apps for that.
- A discussion forum: You can make announcements, and students can really comment on them, but it’s not a great fit for discussions.
Setup Google Classroom

Okay, I’ve got you so far. This means Google Classroom means something to you. You’ll find it easy to set up and very intuitive to keep on using it.
Follow the three steps to set up Google Classroom ‘Teacher Account’:
On Moblie Devices :
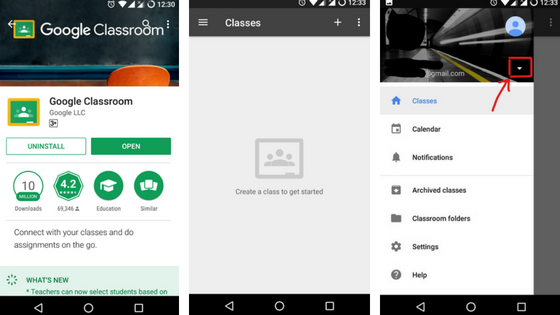
1. Download the Google Classroom App from Playstore or from iTunes and install it.
2. Open the Classroom App and Sign In with your College Email ID and password ( You can use personal one also, but for managing 100 students, College ID is preferable)

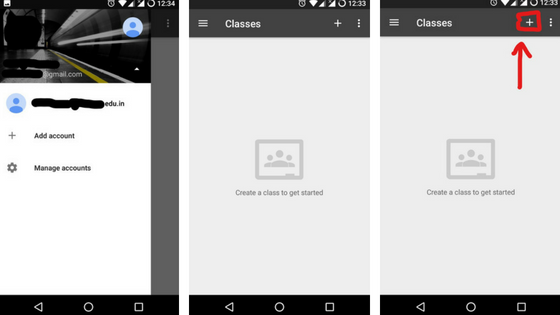
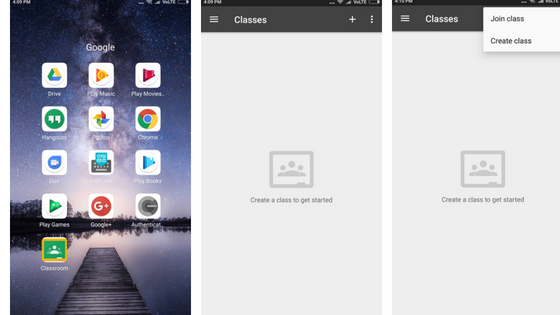
3. Click on the “
+” button in the right upper corner. Choose to “
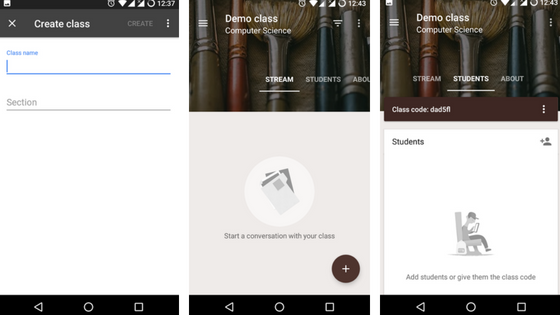
create a class”. Here, you fill in some detail information about your class. Write down a good class name and section. The class name should be the title of your class so you can find it back in a few seconds. Then click on “
create”.

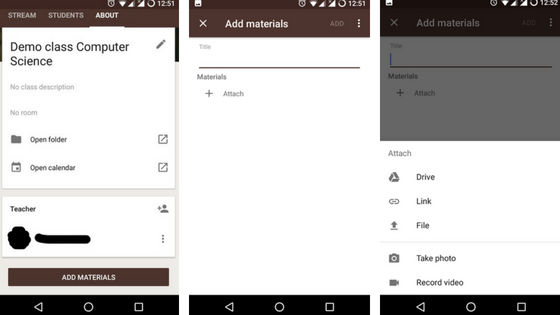
4. Once the class is created, you’ll get the following dashboard. Go to the Students tab to share the class code and to see the list of students enrolled for the class.

5. Add some lesson material to your assignment/ class. Add material from Google Drive or add a YouTube video, a file from your computer, a link, etc. You find these options right beneath the due date. If you just want to share a presentation for your class, which is not linked to an assignment, you can go to the tab “
about”. Here you can add some lesson material like slides, interesting articles, and examples.

6. Access the Drive folder (Classroom Folder). Every time, you create a new class, Google Classroom creates a Drive folder for that class. You can access the folder by going to all your class tiles. On each tile, you’ll find a folder icon. Click on it, and you’re in the folder. Here you can add class materials too. All your students’ assignments automatically end up in the Google Drive folder, so you’ll find it back whenever you want.
On the Website :
1. Go to classroom.google.com and sign up / sign in with college ID as mentioned n above steps. Classes related to same Email ID’s will show up same on the mobile app and on the website.

2. Usage and Interface of the website are quite similar to the mobile application.
Follow the three steps to set up Google Classroom ‘Student Account’:
On Mobile :
1. Download the Google Classroom App from Playstore or from iTunes and install it.
2. Open the Classroom App and Sign In with your College Email ID and password ( You must use College ID, as your teachers are connected on the same network of ID’s under your college domain name.)

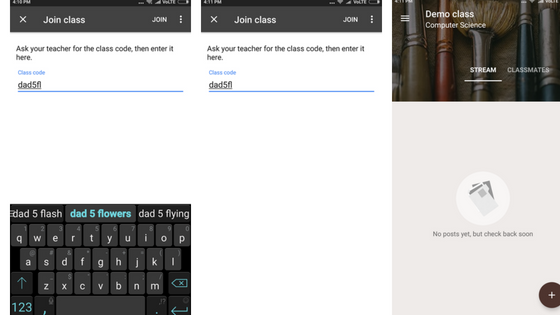
3. Click on the “+” button in the right upper corner. Choose to “Join Class”. Here, you fill in the subject code of your class which your teacher gives you.
4. You’ll get the following interface.

5. You can turn in your assignments, add a class comment and download notes, presentations uploaded by your teacher. Also, all your submitted assignments, pictures, pdf are stored in classroom folders.
On the Website :
1. Go to classroom.google.com and sign up / sign in with college ID as mentioned n above steps. Classes related to same Email ID’s will show up same on the mobile app and on the website.
2. Usage and Interface of the website are quite similar to the mobile application.
I hope I helped you a bit with taking your first steps in Google Classroom. For any question or suggestion, post down in the comments below.